
Chart of Accounts (COA)
- Clear Path Ledger
- Feb 13
- 12 min read
Updated: Apr 2
This guide will explore the following Chart of Accounts (COA) topics:
Please note that although the focus in this guide is QuickBooks Online (QBO), the general ideas and frameworks are applicable across all bookkeeping software and even ERPs.
Downloadable files:
Helpfull Excel file containing the following sheets:
QBO Sample File
QBO Account and Detail Types
Detailed Chart of Accounts
What is a Chart of Accounts
A Chart of Accounts, or COA in short, is an organized, indexed list of every financial account in a company's general ledger, used to categorize transactions. It acts as the foundation for financial reporting, breaking down revenue, expenses, assets, liabilities, and equity to provide a clear view of financial health.
Importance of a well-structured Chart of Accounts
A well-structured Chart of Accounts (COA) is crucial because it organizes all your financial transactions into clear categories (assets, liabilities, equity, revenue, expenses), forming the backbone for accurate financial reporting, deeper business insights (like identifying cost-saving areas), simplified tax compliance and better strategic decisions. Consistently using the same COA over time enables accurate period-to-period comparisons.
A well implemented COA enables:
Organization and Accuracy
Informed Decision-Making
Financial Analysis
Tax and Regulatory Compliance
Investor/Funder Confidence
Scalability
Poorly designed or overly complex COA on the other hand can cause:
Distorted Data
Poor Decisions
Time Wasted
Compliance Issues
Overly complex subcategories
Too many accounts with similar names
Every company has it's own way of operating, preferences, policies, needs, shareholder structure, debt burdens, level of analysis, operational and legislative complexity and so on. All of this means that every company's COA will look different to cater for the business' unique needs.
There is no one COA to copy and use blindly, you should set up your COA to suit your needs. There are however broad structures and principals to apply to ensure a well-structured, robust and scalable COA. Common business types will have strong Income Statement accounts overlap while Balance Sheet accounts (apart from the ones QBO will setup for you), especially equity and debt accounts, will have little overlap and will be more unique to each business.
Clear Path Ledger Premium
We have Income Statement Chart of Accounts templates specifically designed for various common businesses. These curated and import ready Chart of Accounts templates are available in our premium section.
If you prefer to "do it yourself", we also have a template with dynamic dropdowns to help you save time and ensure you select valid Account Type and Detail Type combinations.
PAY ONCE ONLY | Access all current and future new content | Plethora of QBO and other business related templates
High level Chart of Accounts (COA) structure example
Below is a high level COA framework to provide structure and flexibility.
Account Number Range | Account Category | Statement | Statement Category | Account Type (QuickBooks) |
10000-14999 | Current Assets | Balance Sheet | Asset | Bank Accounts receivable (A/R) Current assets |
15000-19999 | Fixed Assets Long-Term Assets | Balance Sheet | Asset | Property, plant and equipment Long-term Assets |
20000-24999 | Current Liabilities | Balance Sheet | Liability | Credit Card Accounts payable (A/P) Other Current Liabilities |
25000-29999 | Long-Term Liabilities | Balance Sheet | Liability | Long-term Liabilities |
30000-39999 | Equity | Balance Sheet | Equity | Equity |
40000-49999 | Income | Profit & Loss | Revenue | Income |
50000-59999 | Direct Costs | Profit & Loss | Cost of Sales | Cost of Goods Sold |
60000-89999 | Indirect Costs | Profit & Loss | Expenses | Expenses |
90000-94999 | Other Income | Profit & Loss | Other Income | Other Income |
95000-99999 | Other Costs | Profit & Loss | Other Expenses | Other Expense |
Table 1
The rest of this guide provides a detailed walkthrough of Chart of Accounts (COA) in QuickBooks Online (QBO) and the suggested COA success frameworks and principals.
How to setup a Chart of Accounts (COA) in QuickBooks Online (Manual and Import function)
When you create your company file, QBO creates a default COA based on your business type, including core accounts like Accounts Payable, Accounts Receivable, Retained Earnings, Sales of Product Income, Payroll Expenses, and essential tax accounts like GST/HST Payable, plus bank/equity accounts for setup.
You can further customize the COA to meet your specific business needs. You can add accounts, edit them, make them inactive or reactivate them. One thing to keep in mind as you’re adding accounts is your usage limit (250 accounts for Simple Start, Essentials and Plus subscriptions while Advanced subscription is unlimited).
Below is a detailed step-step-step guide on how to add a new account. We will explore both Manual and Import methods:
Manual Account Creation
To add an account, go to the Chart of accounts section and click on New Account (top right) of the screen. Here are 2 ways to navigate to the Chart of Accounts:
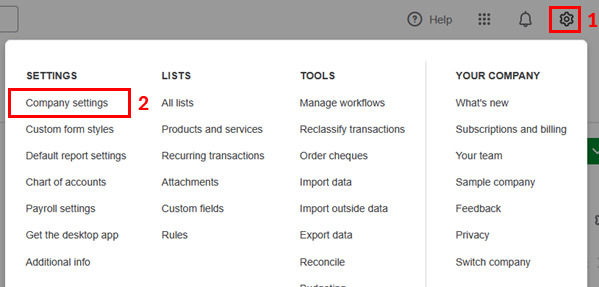
Settings gear icon (top right of QBO)
Click on the gear icon and then on Chart of accounts under the Settings column.

Side menu
Click on Transactions in the side menu (left hand side of QBO). Click on Chart of accounts.

In the Chart of accounts screen, click on New account (top right) to create a new account.

After clicking on New account, you will see the below screen to complete. The fields indicated by an asterisk (*) is mandatory.

Account name (mandatory)
This is a text field to name your account (Bank Fees, Utilities, Interest Income, Inventory etc.). The name should be descriptive yet concise. To keep things clean, decide on a capitalisation structure and stick to it. For example:
Professional and legal fees | Normal |
Professional and Legal Fees | Capitalisation |
PROFESSIONAL AND LEGAL FEES | All caps |
Using "and" or "&" | Ampersand usage |
Account number
Although Account number isn't a mandatory field, it is recommended to use this because it helps choosing the correct account, especially when dealing with parent and child (also know as subaccounts) account relationships. A suggested numbering range is shown in Table 1 of this document.
Ideally, you would set up similar accounts in the same number range. Subaccount numbering is versatile and below are 2 examples of how subaccount numbering can be implemented.
Let's assume you have 3 bank accounts and 2 Wise accounts. Since Bank is a Current Asset on the Balance Sheet, this guide's suggested numbering range is 10000-14999 (per Table 1).
Method A Account Number | Method B Account Number | Account Name | Parent Child (subaccount) |
11000 | 11000 | Bank | Parent |
11001 | 11000.1 | Bank:Scotia CAD Chequing 316 | Child |
11002 | 11000.2 | Bank:Scotia USD Chequing 389 | Child |
11003 | 11000.3 | Bank:Scotia CAD Savings 889 | Child |
11010 | 11001 | Wise | Parent |
11011 | 11001.1 | Wise:USD | Child |
11012 | 11001.2 | Wise:GBP | Child |
Account type (mandatory)
When you’re setting up your chart of accounts, choosing the right account type is crucial because your business’s accounting is built around account types. The account type determines which financial report QuickBooks adds each account’s data to. Choosing the right account type sets you up with accurate reports, such as the balance sheet and profit and loss reports, so you can analyze the financial health of your business.
There are 15 account types in QBO:
Bank
Accounts receivable (A/R)
Current assets
Property, plant and equipment
Long-term Assets
Credit Card
Accounts payable (A/P)
Other Current Liabilities
Long-term Liabilities
Equity
Income
Other Income
Cost of Goods Sold
Expenses
Other Expense
Detail type (mandatory)
Every account listed in your chart of accounts has both an account type and a detail type. Unlike Account Types, Detail Types don’t impact the actual accounting portion of your books. Detail types are there to help you choose the right account type, especially if you’re new to accounting. They also help you break down your account types into “categories” so it’s easier to see a breakdown of what your money is doing.
When you add a new account in the chart of accounts, the Account Type you select will determine the options you have available in the Detail Type field. If you’re not familiar with accounting practices, looking at the different detail types can help you understand what types of transactions are tracked by each account type. If you don’t find one that fits, select the closest match.
Subaccount (child) creation
Create a subaccount in your chart of accounts to help you organize them under a parent account.
Note that the "Make this a subaccount" option will only appear if you have enabled account number usage in your QBO company settings. You can enable this by clicking on the gear icon in the top right of QBO. Select Company settings > Advanced > Chart of accounts > Edit > Set to "On".

To create a subaccount, tick the "Make this a subaccount" box to mark the newly created account as a subaccount.
Select the "Parent account" (mandatory) which this newly created account (child) will be grouped under. Note that the Parent account must be an already existing account.

Over usage of subaccounts and multiple levels of subaccount nesting can get messy very quickly and lead to overcomplication and inconsistent account usage. It all depends on your business needs and operational complexity but at Clear Path Ledger, we recommend using subaccounts where it adds insights and aids financial analysis. Pulling a year-to-date income statement with well structured Parent and subaccounts unlocks quick and easy analysis and points you in the right direction where, at a quick glance, things "look off". On the other hand, if you constantly find yourself collapsing subaccounts to display higher level accounts only, you have probably stepped into the realm of over nesting accounts.
Description
Can be used to provide extra details about that account's purpose to help guide which type of transaction should be booked to the account. We usually leave this field blank. Also note that this field isn't available in the import function.
Import Function Account Creation
You can import a Chart of Accounts from a spreadsheet (Excel, Google Sheets, or CSV) instead of manually creating accounts one-by-one. This is best done when first setting up your company. This guide uses Excel as an example, but the Google Sheets and CSV method follows the same principles.
In the Chart of Accounts screen, click on the down caret to access the Import function.

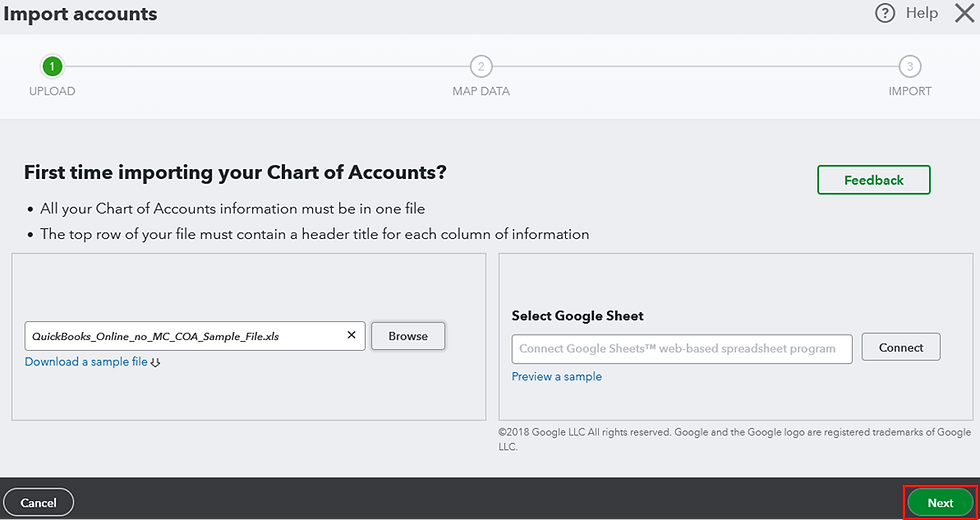
After clicking on Import, you will see a screen with 3 steps to complete.
1. Upload

Click on Browse and navigate to and select the file to import. In this example we are using an Excel file (the same principles apply to the Google Sheet and CSV methods).
The first row of the import file must contain a header title for each column of information (remember that Account name, Account type and Account detail is mandatory and your file must contain these 3 columns as a minimum).
We will use the file you can download from QBO when clicking on "Download a sample file" to demonstrate the import function and some things to look out for.
In QuickBooks Online's example file, note that line 1 has the required header titles.
Line 5 is a practical example of how to format a sub-account. Essentially, you need to state the main account (parent) and the sub-account (child), separated by a colon ":". If you want to nest another level of sub-accounts, simply add another colon and the sub-sub-account name.
The example file includes opening balance and date columns which can be used if you want to import opening balances for balance sheet accounts only.
Once the file is selected, click on Next (bottom right). Note that you can cancel out of this process at any time by clicking Cancel or using the X in the top right.
2. Map Data
In this step, you need to match the "QUICKBOOKS ONLINE FIELD" to the relevant field from your import file. The line 1 header in your file will be selectable in the "YOUR FIELD" table. Ensure that the QBO field is aligned to the relevant field in your import file. Use the down caret if you need to select a different field in the "YOUR FIELD" table.

Remember to make sure you have at least Detail Type, Account Name, and Account Type (annoyingly referred to as "Type" in this import screen) in your import file.
Selecting "No Match" results in that column not being imported.
"TVA code" in the "QUICKBOOKS ONLINE FIELD" table refers to the specific tax code name used within your QBO company file to manage Goods and Services Tax (GST), Provincial Sales Tax (PST), or Harmonized Sales Tax (HST). The value in this column must be the exact name of an active tax code already set up in your QBO account.
After doing and reviewing your mapping, click on Next (bottom right).
3. Import
You will be presented with a summary of the columns and values that QBO will import. You can deselect lines you do not want to import. Items in red needs to be fixed.
In this import example, we used the QBO Sample File exactly as is which resulted in the below import summary:

Cost of Sales in the "TYPE" and Materials in the "DETAIL TYPE" columns are in red because these Type and Detail Type are actually not valid. You can fix the errors right in this screen by using the carets and selecting a valid Type and Detail Type.
The QBO Account and Detail Types sheet in the "QBO COA (Blog)" Excel file contains a complete list of valid options for Type (column C) and Detail Type (Column D). Column D in the QBO Account Type and Detail sheet contains all 130 of the Detail Type to choose from.
See the 15 account types in this sheet for a consolidated list of the 15 valid options for Type field.
Note how all the lines in the file were imported, even the explanatory lines in rows 9, 10 and 11. Therefore, do not include any unnecessary rows that you do not want to be imported. Although you can simply deselect these unwanted lines, best practice is to exclude unnecessary rows.
Once all errors are fixed and you have reviewed the data to be imported, click on Import (bottom right). You will get a success or failure notification. The failure notification will contain detail of what needs to be fixed.


The Detailed Chart of Accounts sheet in the "QBO COA (Blog)" Excel file has a very comprehensive COA import template for you to use. Delete any accounts you don’t need or add lines for your own unique needs. Do not delete row 1, remember that the header row is mandatory.
Google Sheet
You can also connect a Google Sheet. Click on Preview a sample to see what the file should look like. Google Sheet import principles are the same as the above Excel process and won’t be separately explained.

On-going Chart of Accounts maintenance
Add new accounts as your needs grow. Be sure to follow the overall account numbering (if in use) structure, use the correct account naming convention, and select the correct Account Type and Detail Type.
Make an account inactive
You can make an account inactive to remove it from your current Chart of Accounts. This prevents further transactions within it, but doesn't delete it from your records. To make an account inactive, find the account and click on the caret and then click "Make inactive (reduces usage)".

This will bring up a confirmation screen. Click on "Yes, make inactive" to proceed. Click on "Learn more" to go to the QBO website which explains in further detail:
Know more about making accounts inactive
Know more about accounts that you can't make inactive
How to see inactive accounts
How to make an account active again

Merge accounts
A well structured and planned out Chart of Accounts aims to avoid having to merge accounts to begin with. But life happens and you might find yourself in need of merging accounts.
Note:
Merging accounts is permanent and cannot be undone and there are some prerequisites.
Some accounts created by QuickBooks, such as accounts connected to online banking, can’t or shouldn't be merged. If you want to merge, for example, the direct deposit funding account, you will need to contact QBO support.
If you're merging accounts that have reconciliation reports, the account being merged won't keep its reconciliation history. Save those reports first so you don’t lose them. The transactions will remain on the merged account and stay reconciled.
If both account histories have an opening balance equity transaction, you'll need to delete the transaction with the most recent date prior to merging. The older transaction becomes the opening balance of the newly merged account.
If you don't understand the above prerequisites, rather just make an account inactive. If you really need to merge accounts, then do so knowing that there are possible complications, especially with Balance Sheet accounts.
Find the account you want to KEEP. Note the Account name, Account type, and Detail type of the account. These must be the same between the accounts you want to merge. Check if the account is a subaccount or a parent account. The names of subaccounts are indented in the Name column of the Chart of accounts list. If it is, note the parent account it's tied to.
Find the duplicate account (the one you WILL NOT KEEP). Then select the dropdown caret in the Action column, then select Edit. To make the account inactive instead, click on Make inactive.

Change the Account name and Detail Type to that of the account you want to keep. If you are merging 2 parent accounts, make sure they don't have any subaccounts. If you are merging 2 subaccounts, make sure they both have the same parent account. If only one account is a subaccount, change the Account Type to match the other parent account and make it a parent account by unchecking the "Make this a subaccount" checkbox.
Once done and changes reviewed, select Save. The below warning screen will appear.

Select Yes, merge accounts. QBO moves past transactions from the duplicate to the account you want to keep.
And that's it. Now you have a better understanding of what makes a good Chart of Accounts and how to create one in QBO. Check out the Premium Section for a plethora of QBO and other business related templates!
Clear Path Ledger Premium
We have Income Statement Chart of Accounts templates specifically designed for various common businesses. These curated and import ready Chart of Accounts templates are available in our premium section.
If you prefer to "do it yourself", we also have a template with dynamic dropdowns to help you save time and ensure you select valid Account Type and Detail Type combinations.
PAY ONCE ONLY | Access all current and future new content | Plethora of QBO and other business related templates
